The Hand and the Glove... ramblings about making.

Joining the Crafts Council

27.08.13


Today was spent at the Crafts Council in London, being inducted into my new role of Maker Trustee. I spent the day in meetings with various CC folk, learning how the organization operates and being introduced to the main issues that are currently under discussion.

My relationship with the CC goes back to 1985 or 86, when Vicky and I needed to find a new market for our pots and Northern Arts provided CC sponsorship to attend the Chelsea Crafts Fair. It was the last year that it was run by Lady Phillipa Powell, before the Crafts Council took over the show. It was a great success and exactly the type of support that we required at the time. 
In the 1990’s we received 2 travel grants from Northern Arts; the first took us on an extended tour of Hungary to look at traditional slipware. The trip resulted in our work developing in a new, unexpected direction and the writing of a book on contemporary slipware, the research for which was assisted by our second travel grant from Northern Arts. As you will have gathered, the support we had was well-targeted and brought about significant changes to our practice, revitalizing it and ensuring its longevity.
After the Labour goverment came to power in 1997, the Arts Council subsumed the Crafts Council, and my perception was that the organization had lost its autonomy, its efficacy had been diluted and its very existence was uncertain. The move out to Islington (hardly remote!) and the closure of the gallery and the shop at the V&A seemed to support my doubts and the Crafts Council slowly faded from my consciousness. 
However, the past few years have seen resurgence, both in CC activity and interest in craft. Take the ‘Powerof Making’ exhibition, co-curated by the CC and V&A. It attracted 340,000 people; one of the most popular shows ever held at the V&A. There was everything from dry-stone walling to 3D printing and a plethora of exquisite objects that I really wanted to get my hands on. 
For me, the exhibition demonstrated the common language of all makers and how a thatcher in Somerset is engaged in the same thought processes as I am with all my high-tech gear. We share the same approach to materials, processes and techniques and take pride in our ability to use creative thinking to produce meaningful work. The exhibition also demonstrated that ‘making’ is innate; it’s something that is hard-wired in our DNA and has enduring appeal.
So it’s a great time to be involved with the Crafts Council and as a Maker Trustee I am very keen to pass on your thoughts to the board. I am interested to hear about your perception of the CC, whether you feel it represents you as a maker and the type of activities you would like it to be engaged in.

The Future is Here?


The September/ October issue of Crafts Magazine (244) has 2 articles that question the place of 3D printing within the Crafts world. Edwin Heathcote is seriously underwhelmed by the Design Museum’s The Future is Here: A New IndustrialRevolution. He emphasizes what I presume he thinks of as an abuse of the technology in the range of ’ugly, over-engineered and under-thought objects, desperate to convince us that here is a technology that will change the world.’ Though I haven’t seen the exhibition, I suspect that the choice of exhibits is at fault, as I do believe we have a new way of making things that will allow advances in design and manufacturing. I wonder if the exhibition includes examples of 3D printed bio-compatible materials that allow reconstruction of body parts such as the trachea for patients recovering from cancer surgery, or relatively simple objects such as optimized Airbus door hinges that reduce fuel consumption by $1000 a year?
Geoffrey Mann thinks there’s ‘danger in going digital’. Both Heathcote and Mann question the digital aesthetic and the constraints of materials available to 3D printers, but as Mann points out, ‘We’re only at the beginning, surely the best is yet to come’.
I for one would certainly go along with that.

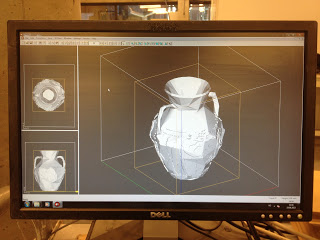
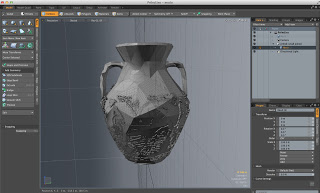
Which brings me to the direction of my own work. For some time I have had the same concerns, and though I have tried to use the technology to make work that doesn’t shout ‘3D printed’ at first sight, it still feels as though it can go further in being integrated with my previous practice. That, after all has been my aim all along. So how do I bring the material qualities, cultural associations and aesthetics of slipware (and other ceramic types) into the world of digital design and Additive Manufacturing? First of all, I must be careful not to lose the creative potential of AM, so the choices are:
·       Print in clay
·       Print moulds for slipcasting
·       Apply an alternative surface finish, one with other cultural associations.

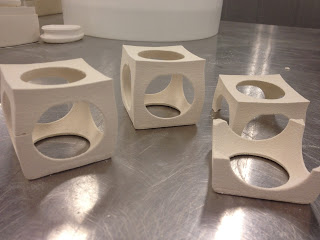
The themes of my most recent work have moved on from simply making ‘impossible’ objects, based on historical ceramics to exploring how we increasingly engage with the physical world through the 2 dimensions of a screen. And no matter how high the resolution, the experience can only ever be a fraction of the real thing.

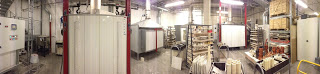
3D Printing in clay is still in its infancy. And though I’m sure it will be refined, it is not going to solve my 
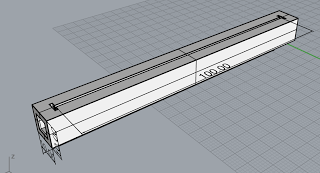
immediate needs. Jonathan Keep, however appears to have produced a reliable ‘Computer Controlled Coiler’, (a development of the Bits from Bytes RapMan 3D printer,) that looks as though it could quite easily be scaled up to produce larger objects. I need to find out more and will be contacting him this week to discuss acquiring one, either for MIRIAD or for my personal use.

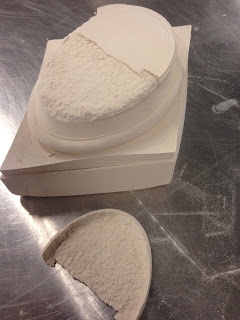
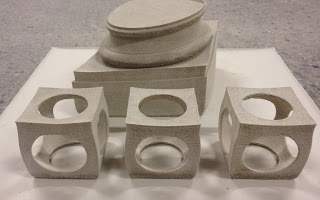
Printing moulds on a ZCorp printer is feasible, however, slipcasting relies on the cast being able to be removed from the mould, therefore it would not be possible to produce objects as complex as the ones that I have so far produced by SLS. My experiment to print pate de verre from a ZCorp mould was successful, but as the mould was destroyed in the process, only one object could be produced. However, that isn’t necessarily a problem.
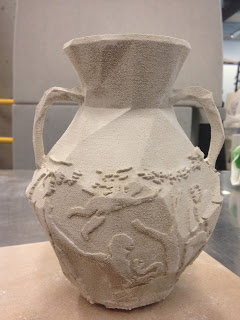
The Matrix 300 paper printer at MIRIAD holds possibilities for producing models from which moulds can be taken. There are limitations, particularly the printing of finely detailed objects as small pieces of paper are prone to clog up the workings, bringing the machine to a grinding, ugly halt!

Applying an alternative surface finish could be a temporary way forward, but the connection to my previous ceramic practice would be broken. So I’m not keen on that route at the present time.

More thoughts to follow…

Ceramic 3D printing tests 07 - some results

Well, it's my last day here at KHIO, for now. I will be returning in Novemeber to speak at the Norwegian Crafts Annual Meeting and hope to spend a few days here at KHIO to conduct some more tests. But by then I should have the ZCorp 406 running back in Manchester and have made some tests of my own.

I plan to continue the postings, and would appreciate any thoughts, reactions or assistance from like-minded explorers.


Results of the test bar firings: 


POWDER TYPE
RATIO *
LENGTH mm **
SHRINKAGE
950°C


Red Clay***
1:1:2
Turned to 'foam'

1:1:3
90
10%
1:1:4
91
9%
Potclays****
1:1:2
± 84
16%
1:1:3
86
14%
1:1:4
89
11%
1000°C
Red Clay
1:1:2
Turned to 'foam'

1:1:3
90
10%
1:1:4
91
9%
Potclays
1:1:2
± 84
16%
1:1:3
86
14%
1:1:4
88
12%
1050°C
Red Clay
1:1:2
Turned to 'foam'

1:1:3

These tests were dipped in vitreous slip, fired to 1000°C, then glazed and fired to 1085°C
1:1:4
Potclays
1:1:2
1:1:3
1:1:4
11000°C
Red Clay
1:1:2
Turned to 'foam'

1:1:3
88
12%
1:1:4
90
10%
Potclays
1:1:2
± 82
18%
1:1:3
83
17%
1:1:4
85
15%
1085°C GLAZE
Red Clay
1:1:2
N/A

1:1:3
89
11%
1:1:4
91
9%
Potclays
1:1:2
83
17%
1:1:3
85
15%
1:1:4
86
14%

* REFERS TO MIX OF SUGAR, MALTODEXTRIN AND CERAMIC POWDER, i.e 1:1:4 =1 part sugar, 1 part maltodextrin, 4 parts ceramic powder.

** Refers to the recessed 100mm line in the test bars measured after firing.

*** Pure red clay supplied by KHIO

**** Potclays ceramic powder mix, contains flux, supplied by Michael Eden (MIRIAD)


The Prtlnd Vase is still in the kiln, hopefully I will be able to unpack it before I leave here this evening... I'll let you know.
A second vase was printed yesterday and is still in the powder...

Ceramic 3D printing tests 06 - and more...

19.06.13

My penultimate day here at KHIO in Oslo and a morning of ups and downs. I mentioned yesterday that we were asked to use a kiln with extraction that has the benefit of being able to control the cooling cycle.

As you can see, the new test cubes, with thicker walls, have suffered in the firing. one has broken in two, one has cracked and the third is OK.


The larger version of my architectural piece has also suffered. It has deformed due to the weight of the upper part and the shell has come away from the core. There are a number of possible causes:
  1. The speed of firing was too fast.
  2. The speed of cooling was too fast.
  3. The structure of the piece was not strong enough.
  4. The binder settings were wrong. 
  5. The ceramic powder formulation.
My feeling is that the cause was primarily either 1 or 2. Previous firings have been successful and the deformation of the pieces has happened in the printer, not in the kiln. 
The structure could be stronger to support the upper part.

We obviously need to conduct more tests, especially as the red earthenware seems to behave itself very well.

I have just found out that the Potclays powder will withstand 1300°C, so I plan to take some of the tests back to Manchester with me and try a selection of high temperature glazes.


So far today, the good news has been my Prtlnd Vase. It appears to have come through the printing unscathed, I'm very pleased with the detail of the surface decoration. There's litle loss of definition. The photograph shows the piece just after it was cleaned up in the depowdering unit, but it is still full of powder at this point. At this moment in time it is sat in a warm kiln, my next job, when I have finished writing this, is to remove the powder from the interior and put it back into the kiln on a warming cycle. And then programme the kiln to start firing at about 10pm this evening.
If it goes well, I will be able to take it home with me to decorate and glaze fire.


Here's what the Prtlnd Vase looked like on the Zprint software.

Before packing up for the day I glazed a selection of tests with the clear glaze and set them to fire overnight.

Tomorrow afternoon's kiln opening will be very interesting, hopefully there will be some posiitve results.

Ceramic 3D printing tests 05 - Yet more...

18.06.13

Only 3 days left here in Oslo and suddenly I'm trying to work out how to fire more kilns than time allows! However, Knut who runs the ceramic workshop has asked me to use a larger kiln that has extraction. The sugars in the ceramic mix were filling the (huge) kiln room with caramelly smells (& smoke). The good thing about the larger kiln is that the cooling can be controlled and assisisted by fans, so I stand a chance to get the majority of the tests through.

Here's the results of the 1100°C firing. The only reason that the red clay bars are broken is that we (very non-scientifically) broke them to see how strong they are in the green, unfired state. The sugars actually make them fairly difficult to break, there was a certain amount of stretching, rather than a simple, clean snap. It gives you more confidence when removing pieces from the printer, though after 2 hours they are still flexible. We find that leaving them overnight is best.


Yesterday afternoon, Trine introduced me to some more tools in the modo software toolbox. I hoped to print a ceramic version of my Prtlnd Vase, an interpretation of the Portland Vase. I produced it in nylon by SLS and it was recently acquired through the Art Fund at Collect for the New Walk Gallery in Leicester.


The handles on the original CAD file are a little thin for ceramic printing and modo was a very useful for rebuilding them intuitively. The software also tidied up the mesh and considerably reduced the file size.
I was keen to build this as large as possible which meant converting all the Potclays powder to 1:1:4 which we think is the strongest of our trials. Trine had mixed some more yesterday, so that was sieved together with the rest and there was enough to completely fill the feed chamber. I had a conversation with Trond, who looks afetr the machines in D-Form. He suggested that the binder settings should be reduced as it could be the cause of the deformation in the build. He thinks they could simply be too wet. So I reduced the Shell to 85% and the Core to 70%. We will see if it has the desired effect.

After putting the build on, I mixed up a lovely lead-based clear earthenware glaze. The recipes that we have used for many years in the studio at home are Lead Sesquisilicate based, but they don't stock it at KHIO (who does?). The recipe I used is taken from 'The Potters Palette' by Christine Constant and Steve Ogden, an excellent source of some fabulous glaze recipes and shamefully out of print.

Lead Bisilicate 65
Whiting 10
Potash Felspar 15
China Clay 10

Fire to 1085°C with a 20 minute soak. A small amount of liquid calcium chloride added to the glaze prevents it from settling out and aids even glazing. But be cautious, if you add too much you can turn the glaze into the consistency of blancmange!


These pieces were popped into the kiln along with some vitreous slipped pieces. The plan for tomorrow is to slip and refire as much as possible and then glaze and fire them.

And then I'll hopefully have time to squeeze the Prtlnd Vase into a firing before my early morning flight back to the UK on Friday morning.

Ceramic 3D printing tests 04 - More

16.06.13

Sunday morning is quiet in Oslo, mind you as a capital city it has a very relaxed, unhurried feel any day of the week. Someone will tell me that I happen to crossing pleasant, residential parts of town, but my impression is that people are friendly and are lucky to enjoy a safe and engaged lifestyle. One major downside though, is the expense. So I'm cooking up big pots of veggie bolognese sauce for pasta.


Anyhow, I arrived at KHIO before 9.00 and went straight down to the kiln room to see the results of the 1000°C firing. 
I have never seen such well equipped facilities as these. The kiln room alone is on an industrial scale, the students must either feel really excited on seeing them or completely daunted, particularly as some ceramics students have never touched clay before starting their degree!

The red clay 1:1:2 mix has decomposed more than at 950°C, but the other test bars look pretty similar. 
The shrinkage is approximately 14%, which I think is acceptable. When the tests are  finished I'll analyse them more carefully and publish the findings so that comparisons can be made easily.


I started another build with a new, larger version of my architectural piece and a test cube with thicker walls. This time I filleted the edge of the circular openings, as the first version has edges that are sharp and brittle.


And here are the 1050°C tests, the photograph taken just after the 'african vegetable' has been picked up! It came out of the kiln in one piece, quite an achievement considering the sections were very thin. I don't understand why the piece at the bottom right of the photograph broke in the firing. I don't think it was a stress fracture. The Potclays 1:1:3 and 1:1:4 are stronger than at the lower temperatures and are slightly stronger than the red earthenware versions.


The test cubes fired with very little extra distortion. They have now been dipped into the vitreous slip and await firing.